
Прежде чем ставить Nextcloud по этой инструкции, вначале установите LEMP-стек. Если он не установлен, и вы хотите знать как это сделать, то проследуйте по ссылке.
Данная статья создана с небольшой переработкой из статьи про установку Nextcloud для Ubuntu 18
Шаг 1: Скачиваем Nextcloud
Зайдите на сервер и загрузите на него архив Nextcloud. Последняя стабильная версия 29.0.4 на момент публикации. Скачать её можно на https://nextcloud.com/install, раздел «Download server» пункт COMMUNITY PROJECTS и выбрать кнопку «Download for server».

Можно wget’ом скачать его на сервер сразу же. Так и сделаем. Скачаем последнюю версию.
wget https://download.nextcloud.com/server/releases/latest.tar.bz2
Распакуем
sudo tar -xjf latest.tar.bz2 -C /usr/share/nginx/
Опция -C указывает путь, куда распакуется Nextcloud.
Если в процессе распаковки появилась ошибка «tar (child): bzip2: Cannot exec: No such file or directory«, то установите пакет bzip2.
sudo apt install bzip2
Изменим владельца файлов для корректной работы сервера
sudo chown www-data: /usr/share/nginx/nextcloud/ -R
Шаг 2. Создаём базу данных для Nextcloud
Логинимся на сервер MariaDB нижеследующей командой. С тех пор как MariaDB стала использовать плагин unix_socket для аутентификации, необходимость вводить root пароль отпала. Просто запустим оболочку под sudo.
sudo mariadb
Запуститься оболочка MySQL сервера MariaDB. Начнём процесс установки.
Создадим базу данных для Nextcloud
create database nextcloud;
Создадим пользователя, у которого будут права на эту базу и который будет ей управлять. Имя можно выбрать любое, главное запомнить его. Вместо your-password подставьте свой придуманный пароль.
create user nextclouduser@localhost identified by 'your-password';
Выдайте новому пользователю права на новую базу данных
grant all privileges on nextcloud.* to nextclouduser@localhost identified by 'your-password';
Примените изменения
flush privileges;

exit;
Шаг 3. Создаём конфигурационный файл nginx для Nextcloud.
Создайте файл nextcloud.conf в директории /etc/nginx/conf.d/
sudo nano /etc/nginx/conf.d/nextcloud.conf
Файл описан в инструкции на сайте разработчиков
Вставьте нижеследующий текст в новый файл. Жирным начертанием выделены строки на замену
upstream php-handler {
    server unix:/run/php/php8.3-fpm.sock;
}

# Set the `immutable` cache control options only for assets with a cache busting `v` argument
map $arg_v $asset_immutable {
    "" "";
    default ", immutable";
}

server {
    listen 80;
    listen [::]:80;
    server_name cloud.example.com;

    # Prevent nginx HTTP Server Detection
    server_tokens off;

    # Enforce HTTPS
    return 301 https://$server_name$request_uri;
}

server {
    listen 443      ssl http2;
    listen [::]:443 ssl http2;
    server_name cloud.example.com;

    # Path to the root of your installation
    root /usr/share/nginx/nextcloud;

    # Use Mozilla's guidelines for SSL/TLS settings
    # https://mozilla.github.io/server-side-tls/ssl-config-generator/
    ssl_certificate     /etc/nginx/cert/server.crt;
    ssl_certificate_key /etc/nginx/cert/server.key;

    # Prevent nginx HTTP Server Detection
    server_tokens off;

    # HSTS settings
    # WARNING: Only add the preload option once you read about
    # the consequences in https://hstspreload.org/. This option
    # will add the domain to a hardcoded list that is shipped
    # in all major browsers and getting removed from this list
    # could take several months.
    #add_header Strict-Transport-Security "max-age=15768000; includeSubDomains; preload" always;

    # set max upload size and increase upload timeout:
    client_max_body_size 512M;
    client_body_timeout 300s;
    fastcgi_buffers 64 4K;

    # Enable gzip but do not remove ETag headers
    gzip on;
    gzip_vary on;
    gzip_comp_level 4;
    gzip_min_length 256;
    gzip_proxied expired no-cache no-store private no_last_modified no_etag auth;
    gzip_types application/atom+xml text/javascript application/javascript application/json application/ld+json application/manifest+json application/rss+xml application/vnd.geo+json application/vnd.ms-fontobject application/wasm application/x-font-ttf application/x-web-app-manifest+json application/xhtml+xml application/xml font/opentype image/bmp image/svg+xml image/x-icon text/cache-manifest text/css text/plain text/vcard text/vnd.rim.location.xloc text/vtt text/x-component text/x-cross-domain-policy;

    # Pagespeed is not supported by Nextcloud, so if your server is built
    # with the `ngx_pagespeed` module, uncomment this line to disable it.
    #pagespeed off;

    # The settings allows you to optimize the HTTP2 bandwidth.
    # See https://blog.cloudflare.com/delivering-http-2-upload-speed-improvements/
    # for tuning hints
    client_body_buffer_size 512k;

    # HTTP response headers borrowed from Nextcloud `.htaccess`
    add_header Referrer-Policy                   "no-referrer"       always;
    add_header X-Content-Type-Options            "nosniff"           always;
    add_header X-Frame-Options                   "SAMEORIGIN"        always;
    add_header X-Permitted-Cross-Domain-Policies "none"              always;
    add_header X-Robots-Tag                      "noindex, nofollow" always;
    add_header X-XSS-Protection                  "1; mode=block"     always;

    # Remove X-Powered-By, which is an information leak
    fastcgi_hide_header X-Powered-By;

    # Set .mjs and .wasm MIME types
    # Either include it in the default mime.types list
    # and include that list explicitly or add the file extension
    # only for Nextcloud like below:
    include mime.types;
    types {
        text/javascript mjs;
	application/wasm wasm;
    }

    # Specify how to handle directories -- specifying `/index.php$request_uri`
    # here as the fallback means that Nginx always exhibits the desired behaviour
    # when a client requests a path that corresponds to a directory that exists
    # on the server. In particular, if that directory contains an index.php file,
    # that file is correctly served; if it doesn't, then the request is passed to
    # the front-end controller. This consistent behaviour means that we don't need
    # to specify custom rules for certain paths (e.g. images and other assets,
    # `/updater`, `/ocs-provider`), and thus
    # `try_files $uri $uri/ /index.php$request_uri`
    # always provides the desired behaviour.
    index index.php index.html /index.php$request_uri;

    # Rule borrowed from `.htaccess` to handle Microsoft DAV clients
    location = / {
        if ( $http_user_agent ~ ^DavClnt ) {
            return 302 /remote.php/webdav/$is_args$args;
        }
    }

    location = /robots.txt {
        allow all;
        log_not_found off;
        access_log off;
    }

    # Make a regex exception for `/.well-known` so that clients can still
    # access it despite the existence of the regex rule
    # `location ~ /(\.|autotest|...)` which would otherwise handle requests
    # for `/.well-known`.
    location ^~ /.well-known {
        # The rules in this block are an adaptation of the rules
        # in `.htaccess` that concern `/.well-known`.

        location = /.well-known/carddav { return 301 /remote.php/dav/; }
        location = /.well-known/caldav  { return 301 /remote.php/dav/; }

        location /.well-known/acme-challenge    { try_files $uri $uri/ =404; }
        location /.well-known/pki-validation    { try_files $uri $uri/ =404; }

        # Let Nextcloud's API for `/.well-known` URIs handle all other
        # requests by passing them to the front-end controller.
        return 301 /index.php$request_uri;
    }

    # Rules borrowed from `.htaccess` to hide certain paths from clients
    location ~ ^/(?:build|tests|config|lib|3rdparty|templates|data)(?:$|/)  { return 404; }
    location ~ ^/(?:\.|autotest|occ|issue|indie|db_|console)                { return 404; }

    # Ensure this block, which passes PHP files to the PHP process, is above the blocks
    # which handle static assets (as seen below). If this block is not declared first,
    # then Nginx will encounter an infinite rewriting loop when it prepends `/index.php`
    # to the URI, resulting in a HTTP 500 error response.
    location ~ \.php(?:$|/) {
        # Required for legacy support
        rewrite ^/(?!index|remote|public|cron|core\/ajax\/update|status|ocs\/v[12]|updater\/.+|ocs-provider\/.+|.+\/richdocumentscode(_arm64)?\/proxy) /index.php$request_uri;

        fastcgi_split_path_info ^(.+?\.php)(/.*)$;
        set $path_info $fastcgi_path_info;

        try_files $fastcgi_script_name =404;

        include fastcgi_params;
        fastcgi_param SCRIPT_FILENAME $document_root$fastcgi_script_name;
        fastcgi_param PATH_INFO $path_info;
        fastcgi_param HTTPS on;

        fastcgi_param modHeadersAvailable true;         # Avoid sending the security headers twice
        fastcgi_param front_controller_active true;     # Enable pretty urls
        fastcgi_pass php-handler;

        fastcgi_intercept_errors on;
        fastcgi_request_buffering off;

        fastcgi_max_temp_file_size 0;
    }

    # Serve static files
    location ~ \.(?:css|js|mjs|svg|gif|ico|jpg|png|webp|wasm|tflite|map|ogg|flac)$ {
        try_files $uri /index.php$request_uri;
        # HTTP response headers borrowed from Nextcloud `.htaccess`
        add_header Cache-Control                     "public, max-age=15778463$asset_immutable";
        add_header Referrer-Policy                   "no-referrer"       always;
        add_header X-Content-Type-Options            "nosniff"           always;
        add_header X-Frame-Options                   "SAMEORIGIN"        always;
        add_header X-Permitted-Cross-Domain-Policies "none"              always;
        add_header X-Robots-Tag                      "noindex, nofollow" always;
        add_header X-XSS-Protection                  "1; mode=block"     always;
        access_log off;     # Optional: Don't log access to assets
    }

    location ~ \.woff2?$ {
        try_files $uri /index.php$request_uri;
        expires 7d;         # Cache-Control policy borrowed from `.htaccess`
        access_log off;     # Optional: Don't log access to assets
    }

    # Rule borrowed from `.htaccess`
    location /remote {
        return 301 /remote.php$request_uri;
    }

    location / {
        try_files $uri $uri/ /index.php$request_uri;
    }
}
Включение HTTPS
[…]Здесь в оригинале были шаги по включению https, но я считаю это темой отдельной статьи, так как там используется получение сертификатов через LetsEncrypt. Можете глянуть в оригинале. […]
Но если кратко, то рекомендую создать в папке nginx самоподписные сертификаты
sudo mkdir /etc/nginx/cert
cd /etc/nginx/cert
sudo openssl req -x509 -newkey rsa:4096 -keyout server.key -out server.crt -nodes -days 3650 -subj '/CN=localhost'
Не забудьте перезапустить nginx
sudo systemctl reload nginx
После всего на обратном прокси (если он у вас есть конечно) можете указать путь до этого сервера по https протоколу.
Шаг 4. Установка php-модулей.
Выполните нижеприведённую команду, чтобы установить требуемые или рекомендованные модули php для Nextcloud.
sudo apt install php-imagick php8.3-zip php8.3-bz2 php8.3-intl
Финиш. Заключительные штрихи
Для большей безопасности поменяем папку с данными и не будем хранить их в корне веб-сервера. Расположим их, например, в
/usr/share/nginx/nextcloud-data, используя следующую команду
sudo mkdir /usr/share/nginx/nextcloud-data
Сделаем владельцем этого каталога пользователя www-data
sudo chown www-data: /usr/share/nginx/nextcloud-data -R
P.S. Если вы следовали советам статьи по установке LEMP, то удалите файл default.conf. Если его не удалить, то будет показываться окно приветственной страницы nginx.
sudo rm /etc/nginx/conf.d/default.conf
Можно ещё удалить файл default в /etc/nginx/sites-enabled/, если вы хотите заходить на nextcloud по http и сделали необходимые изменения в файле конфига.
sudo rm /etc/nginx/sites-enabled/default.conf
Теперь заходим на https://nextcloud_IP/ и видим окно установки. (Или заходим на http://nextcloud_ip/, если отключили в конфиге nginx https)
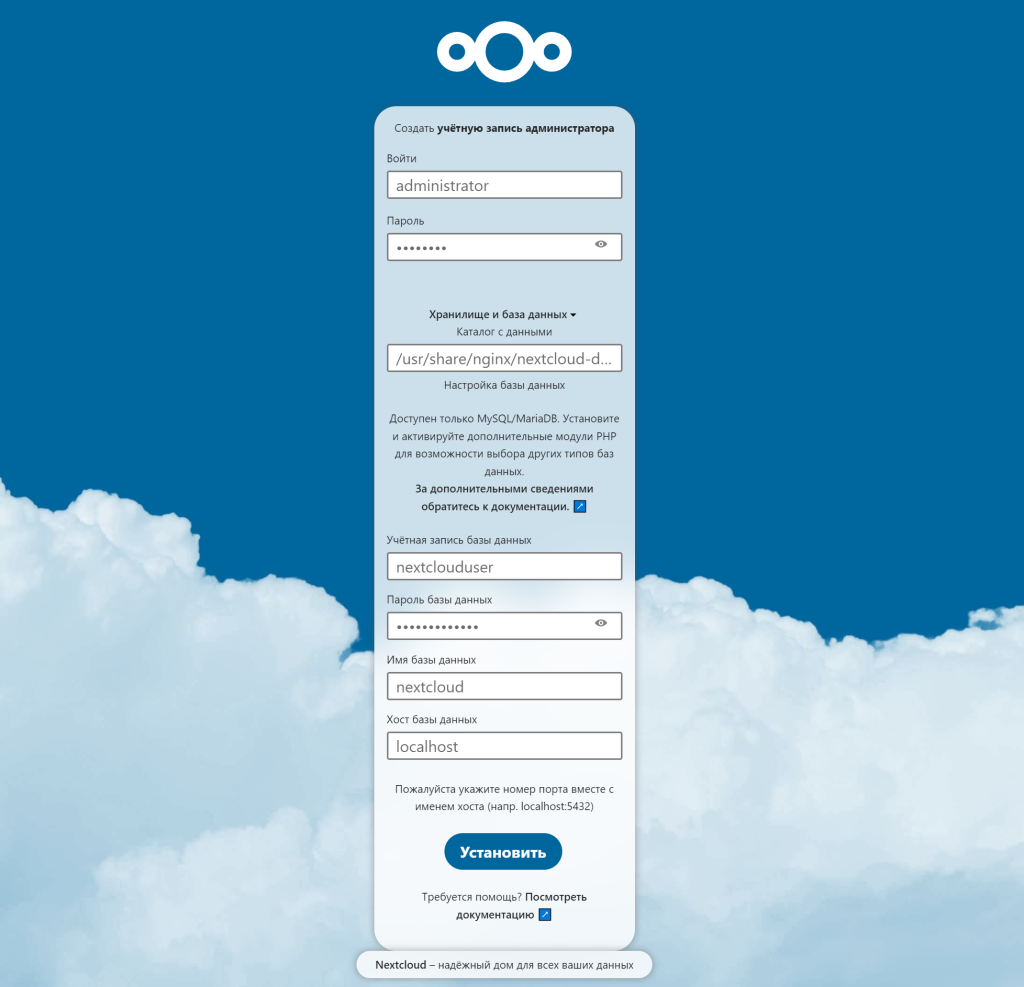
Вводим имя администратора, придумываем пароль. Ниже указываем путь до каталога данных Nextcloud, вписываем учётную запись базы данных («nextclouduser»), пароль пользователя к базе данных (в данном случае это «your-password»), имя базы данных («nextcloud»). Жмём кнопку «Установить» и переходим к следующему шагу.
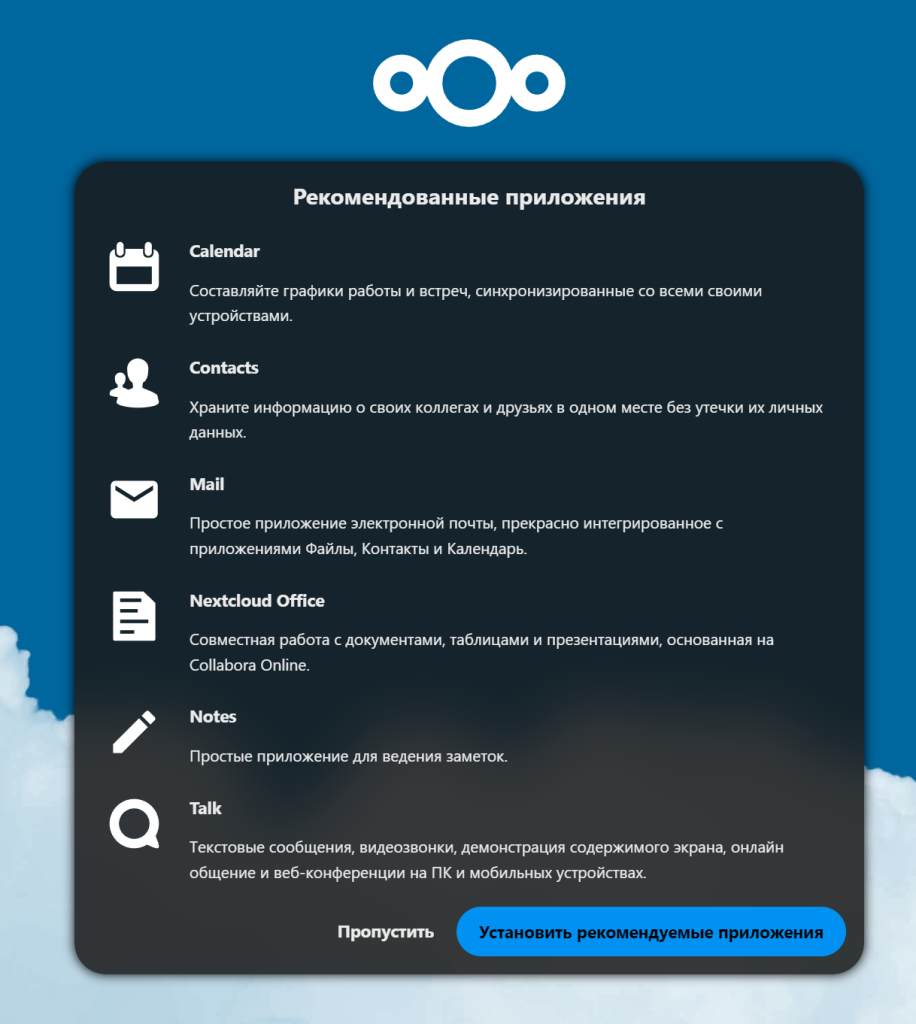
На этом шаге можете поставить рекомендуемые приложения, а можете пропустить установку.
Установка завершена. Вас будет приветствовать стартовый экран Nextcloud с кратким описанием возможностей. Как видно, заметных отличий от установки в Ubuntu 20 нет. Но для быстрой установки, чтобы не путаться в версиях php-fpm я написал данную статью.
Впереди немного настроек и настройка резервного копирования. Ну и если хочется посмотреть видео установки, то оно ниже — основано на статье про установку Nextcloud на Ubuntu 18.
Сделал все по инструкции, на начальной странице заполняю все данные, жму установить обновляется страница и ничего не происходит, дважды с нуля переустановил сервак одна и та же проблема, что я не так делаю?
Ошибка может быть как в конфигурационном файле, берите его лучше с сайта разработчиков, в недостающих модулях (nextcloud может поменять требования к модулям, надо проверить), и в браузере (попробуйте из инкогнито поставить)
Добрый день! Подскажите, пожалуйста, за NAT не открываются документы через collabora office, пытается загрузить и через некоторое время выдаёт ошибку: Неудалось загрузить набор офисных приложений для Nextcloud и кнопка закрыть. Также через приложение при открытии постоянно идёт инициализация и не открывается документ.. В локальной сети работает отлично. С чем мгут быть связаны проблемы?
Проблемы могут быть как раз с пробросом портов за NAT. Коллабору не использую, там вероятно или свои пути или свои порты. Если это всё работает через образ All-in-one, то уже смотреть их документацию. А так — смотреть, что «не пускает» NAT
Спасибо за ваши труды, по вашему мануалу установил и настроил для не большого офиса next cloud, буду следить за вашими публикациями
Отличная статья! Только возник вопрос, как добавить SSL сертификат для привязанного домена?